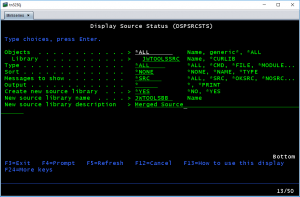
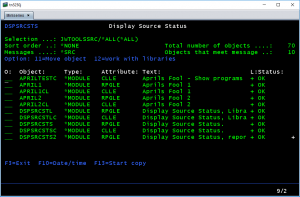
 Display Source Status is a command that allows you to work with the sources for your objects and optional create a new library containing the ‘correct’ sources.
The command will display the relation between the selected objects and the source member that these objects are build from. Depending on the parameters you enter on the command prompt, you will either just see the status of the sources or be able to work with the sources.
The command is especially helpful if you have several versions of the source members in various libraries and have lost track of which one is the correct one the object was build from.
Documentation
Build library list to be searched
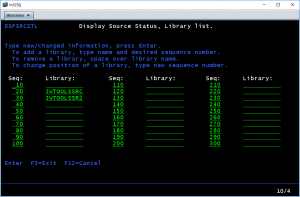 To begin with, you must enter the library list that the command must use when it looks for source members. To do this, issuse the command:
JWTOOLS/DSPSRCSTSL
on an IBM i command line and press [ENTER].
You will be presented a screen that looks and works just the IBM command EDTLIBL. Enter the libraries you want to be searched in the order you want them to be searched. When the library list is as you want it, press [F3] to save the library list. The library list is saved in a *DTAARA and does not in any when change the library list of the current job.
Work with source status
JWTOOLS/DSPSRCSTS
on an IBM i command line and press [F4]. Fill in the fields on the command prompt.
Field and their meaning:
- Objects
- Type a name, partial name or a generic name of the object(s) for which you want to display or print the source status.
- Library
Type the library name where the object(s) are stored. - Type
Select the object type the command should process:- *ALL
- *CMD
- *FILE
This includes database and display files. - *MODULE
- *PGM
Please note, that this command only processes the *PGM object for OPM programs. For ILE programs, you must process their modules instead, by selecting the *MODULE (or *ALL) value. - *TBL
- *QMQRY
- *QMFORM
- Sort
- *NONE
Objects are displayed in the standard IBM order, that is, just as you normally see the objects in PDM. - *NAME
Objects are sorted by their name, then their object type (alphabetic). - *TYPE
Objects are sorted by their type (alphabetic), then their name.
- *NONE
- Messages to show
This keyword control which of the processed objects that are displayed or printed.- *ALL
All processed objects are displayed or printed. - *SRC
Only objects that where build using a source are displayed or printed. Note, that database files can be build from a source or they can be build by entering a record length on the CRTPF command prompt. - *OKSRC
Only objects that match a source is displayed. The source must exists and the source date/time must match. - *NOSRC
Only objects where the source cannot be found are displayed. - *OLDSRC
Only objects where the source found is older than the source date/time stamp in the object, are displayed. - *NEWSRC
Only objects where the source found is newer that the source date/time stamp in the object, are displayed. - *ERRSRC
Only objects having one of the three problems (not found, older or newer source) with their source, are displayed.
- *ALL
- Output
- *
Output is displayed on the screen. This option is required if you want to copy or work with the source. - *PRINT
A report is produced and placed in the default output queue.
- *
- Create new source library
- *NO
A library is not created and you will not be able to copy source members from the screen. - *YES
A new library is created and you can copy all source members to that library.
- *NO
- New source library name
Enter the name of the library to be created.This keyword is only shown if you entered *YES to ‘Create new library’, and it must be filled. - New source library description
Enter the description for the library to be created.This keyword is only shown if you entered *YES to ‘Create new library’, and it must be filled.
 When you press [ENTER] the command will retrieve information about the objects. This may take a little while. Then the main screen is displayed.
If you choose to create a new source library, then the text ‘F13=Start copy’ will be displayed in the F-key line on the screen.
Initial the screen will show a summery list of the objects selected. Most of the columns are self explanatory. If there is a ‘+’ in the column ‘L:’ it indicated that the source member for the object, was found in more than one library in the library list defined earlier (the command DSPSRCSTSL). The column ‘Status’ shows the relation between the source date/time stamp in the object compared to the source member found.
Status can have the following values:
- * N/A *
The object type is not build from a source member. - OK
The source date/time stamp in the object matches the source member found. - New src
The source member found is newer than the source date/timne - Old src
- No source
The source could not be found.
F-keys
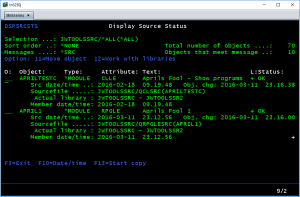 On the screen you can use the following function keys:
- F3=Exit
Will exit the utility. - F10=Date/time
Toggles between summery display and detailed display. The detailed display shows the source date/time stamp from the object and the source file/member information from the object. Further information about where source members were found is also displayed. - F13=Start copy
This F-key is only shown, and is active, if you have selected to create a new library for source.
Options
The following options can be used against each object shown in the list:
- 11=Move object
This option brings up the command MOVOBJ in prompt mode, allowing you to enter the name of the library where the object is to be moved. - 12=Work with libraries
This option shows a screen where the source members that match in name and source file is shown.
Work with libraries screen
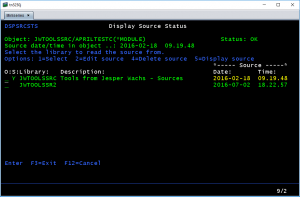 This screen shows the libraries where source members were found that match the name and source file. You can then select which source member that should be copied, if you choose to create a new source library, you can delete, edit and display the source members.
The feature ‘Select’ is used to mark the source member that is to be copied when you press [F13] on the main screen.
The process of copying source members
When you are ready to copy the selected source members press [F13] in the main screen. The command will copy source members, creating the needed source files during the copy. When the copying has finished, the command ends, and you can now work on the new source library and (re-)build your application.

